
Introduction
New Jersey’s weather can be as unpredictable as traffic on the Turnpike. One moment it’s sunny, and the next you might find yourself rearranging pots and pans to catch water dripping from the ceiling. The Garden State isn’t tropical, but heavy spring rains, summer thunderstorms, and the occasional nor’easter mean roof leaks are a common headache during the rainy season. A leaky roof can turn your cozy home or managed property into an unintended water park if you’re not prepared.
In this guide, we’ll walk New Jersey homeowners and property managers through handling roof leaks with a professional tone (and just a dash of humor). From spotting the first signs of trouble to taking DIY emergency measures and knowing when to call in the pros, we’ve got you covered – literally! By the end, you’ll be ready to stay calm, dry, and prepared no matter how hard it’s pouring outside.
Signs of a Roof Leak
How do you know if your roof has sprung a leak (aside from the obvious drip hitting your forehead)? Here are some telltale signs to watch for before the problem worsens:
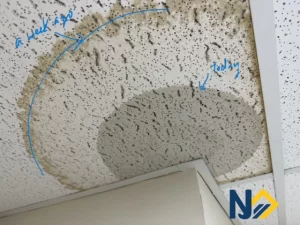
Water Stains on Ceilings or Walls: Look for discolored patches or rings (often brown or yellow) on your drywall or plaster. Even small water stains can indicate a slow leak that needs attention. Remember, water can travel along rafters far from the entry point, so the stain might not be directly under the roof breach.
Drips or Moisture in the Attic: If you venture into the attic during or after a rain, pay attention to any dripping sounds, damp wood, or puddles. Actual drips or puddles in the attic are a clear sign water is finding its way in. You might also notice wet insulation or water around vents and chimneys – common leak zones.
Peeling or Bubbling Paint: Excess moisture can cause paint or wallpaper on your ceilings and upper walls to blister and peel. If you see new bubbles or peeling patches, it could mean water is pooling behind that surface. Don’t just blame it on old paint – it’s often a red flag for a leak overhead.
Musty Odors or Mold: A hidden leak will create a damp environment that mold loves. If you catch a persistent musty smell in your attic or upstairs rooms, or actually spot mold or mildew, water is likely intruding somewhere. Mold growth often means the leak has been present for a while, so act quickly.
Damaged or Missing Shingles: Take a look at your roof from the outside (binoculars help). Shingles that are cracked, curled, or missing can expose your roof to leaks. After a storm, check your yard for shingle pieces and inspect the roof for bald spots. If you see your roof’s “bald spots” or materials out of place, water may be sneaking in where those shingles used to be.
Sagging Roof or Ceiling: In extreme cases, a portion of the roof deck or the interior ceiling might sag or bulge due to prolonged water absorption. This is a serious warning sign – the structure has been compromised by moisture and could even risk collapse if not addressed.
Being alert to these signs can save you a lot of trouble. Catching a leak early – when you just have a small stain or a little drip – is far better than discovering it after your ceiling resembles a waterbed. If you notice any of the above, it’s time to take action before the next rainstorm turns it into an emergency.
Immediate Steps to Minimize Damage During a Storm
When you realize water is coming through the roof during a storm, you might feel panic – but don’t lose your cool. There are a few immediate steps you can take in the middle of the downpour to protect your home and belongings (and your sanity) until you can get a proper fix. Here’s how to triage the situation:
Clear the Area: First, move your valuables, furniture, and electronics out of harm’s way. Unplug and relocate any electrical items near the leak to avoid electrical shocks or shorts (water and electronics are a dangerous mix). If you can’t move something, cover it with plastic sheeting or even garbage bags to shield it from water.
Catch the Water: Place buckets, pots, or any large container under the drip to catch the incoming water. This sounds obvious, but it’s crucial – you want to minimize water spreading across your floors. Empty the containers regularly so they don’t overflow.
Relieve Ceiling Pressure: If you notice a bulge or bubble forming in the ceiling drywall where water is pooling, grab a screwdriver or a sharp tool and carefully poke a small hole in the center of the bulge. It seems counterintuitive to poke a hole in your ceiling on purpose, but doing so allows the water to drain out into your bucket in a controlled way.
Protect Yourself (and Your Electrical System): If water is leaking near light fixtures or outlets, or if there’s significant ceiling saturation, consider turning off the electricity in that part of the house as a precaution.
Stay Off the Roof: It might be tempting to climb up and try a quick patch in the middle of the storm, but don’t do it. Clambering onto a wet, slippery roof during heavy rain or wind is extremely dangerous. Instead, wait until the weather has calmed to address the roof directly, or call for professional help if the storm is ongoing.
Document the Damage (if you can safely): If conditions allow, take photos or video of the leaking areas and any property that’s been damaged. This is useful for insurance claims later.
Temporary DIY Fixes for Roof Leaks
Once the storm has passed and it’s safe to venture forth, you can apply some temporary fixes to plug the leak until professional help arrives. Keep in mind, these are short-term remedies – a bandage, not a permanent cure. Here are a few ways to temporarily shore up your leaky roof:
Cover the Leaking Area with a Tarp: A high-quality waterproof tarp is your best friend for sizable leaks or missing shingles. Carefully climb up (in good weather) and spread a heavy-duty tarp over the problem area. Secure it tightly by extending the tarp beyond the leaky section and weighing or nailing down the edges.
Apply Roofing Tape or Sealant: For smaller leaks – water trickling around a vent pipe or a small puncture – roofing tape or roof sealant can offer a quick patch. Apply it on a clean, dry surface for best results.
Use Plastic Sheeting if You Have No Tarp: Heavy-duty plastic sheeting can serve as a makeshift tarp. Nail or staple it over the leaky area, or tack it up inside the attic to catch water.
Quick Patch for a Small Hole: Slide a piece of galvanized metal or rigid plastic over a hole and caulk around it as a temporary fix. It won’t be pretty, but it can buy you time.
When to Call a Professional Roofer
You’ve managed the crisis and applied a temporary fix – but now it’s time to get serious. Call a licensed roofing contractor if:
The Leak Persists or Is Severe
You Spot Structural Damage
You’re Unsure of the Leak’s Source
Your Roof Is Old or Damaged
There Are Safety Concerns
You Need Emergency Services
Choose a reputable roofer licensed in NJ, and document everything for insurance. A professional repair is your best path to long-term peace of mind.
Preventive Maintenance Tips
Stay ahead of leaks with these tips:
Inspect Roof Regularly (Spring & Fall)
Keep Gutters and Downspouts Clean
Repair Shingles and Flashing Promptly
Trim Overhanging Trees
Ensure Proper Attic Ventilation and Insulation
Monitor After Heavy Rains
Schedule Professional Roof Checkups
Closing Thoughts
Dealing with a roof leak is never fun, but with preparation, you can handle it like a pro. Catch leaks early, stay calm during storms, apply smart temporary fixes, and know when to call in the experts. With regular maintenance and a little roofing know-how, you can weather New Jersey’s rainy season without turning your home into a slip-and-slide.
Stay dry out there!